ADJUSTMENT
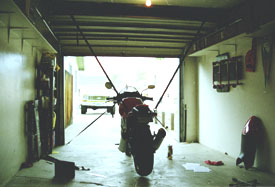
Front (Straps and Anchors or Several Buddies)
It's gotten a bad rap as an underperformer, but it is still a quality piece with much
better adjustment than many other sportbike shocks allow. Then again, why
wouldn't it? It's a Ducati.
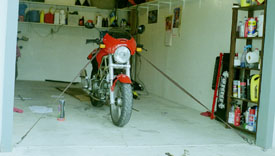
readings is to have the front end balanced. You can have somebody
hold the bike every time you need to measure, but it's better to
save them for the loaded sag measurements. To balance the front,
I used two tie down straps from the bars to the anchors in my
garage floor. Before tightening them down, I took a zip tie and
wrapped it around the grip and brake lever to keep it from rolling.
Then I tightened the straps and ta-da! It was held there like magic.
of the rear axle to a fixed point on
the frame directly above it with the
bikes weight OFF the suspension.
Have a buddy lift the rear of the
bike as high as he or she can, or
use the method outlined below for
suspending the rear.
center of the rear axle to a fixed
point on the frame directly above
it with the bikes weight ON the
suspension. I made a pencil
tickmark and measured to that
each time.
of the rear axle to a fixed point on
the frame directly above it with the
rider's full weight (gear included)
ON the suspension. Loaded dip is
not an offical term, but I didn't
know what else to call it :)
stock setting is too soft, allowing too much sag. So, how do you fix it?
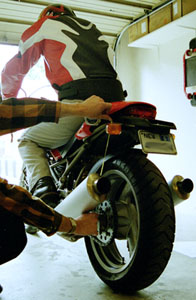
Well, the first step involves suspending the rear of the bike. It's very
easy to install eyebolt anchors in the studs of the ceiling, or figure out
something else to suspend it from. Here, I used the same strap method
as the front, only I hung them from eye bolts in the ceiling attached to
the grab rails of the frame, and lifted it a little at a time on each side
using the ratchets on the straps. Note that the rear tire is completely
off the ground, and therefore the suspension is completely unloaded.
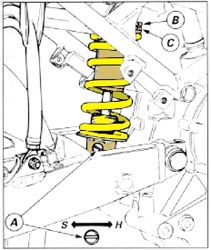
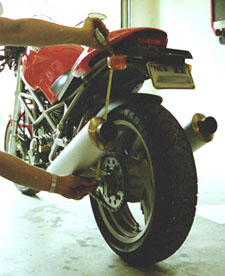
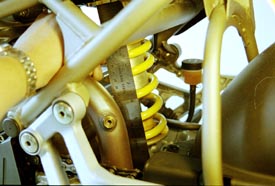
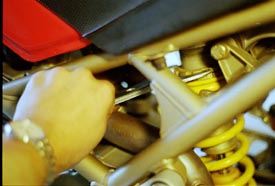
components of the suspension. The piece labeled "B" is the
lock ring (nut), the piece labeled "C" is the adjuster ring (nut),
and "A" is the rebound damper adjuster. It's also good to
know exactly what you're adjusting. "Preload" is just that- a
preset tension on the spring, as if there was weight
compressing it. If there were no preload, the spring would be
way to "springy" and would bounce your suspension to pieces.
The suspension needs to be somewhat tight in order to handle
well.
suspension. My manual gives a baseline of 6.49 inches for the
preloaded spring height. This is the height of the spring with the
suspension unloaded, and the adjuster rings in their normal position.
So, get the suspension unloaded (by removing the shock or suspending
the rear tire off the ground) and adjust the rings up or down so that
there is 6.49 inches of overall spring height, measured from the top of
the spring to the bottom.
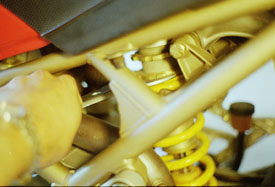
loosen the lock ring on top. Use a preload spanner
wrench (available at any bike store) and wrench it free.
It will be a bitch, so be prepared.
Moving it up reduces preload, and makes the spring rate softer.
Moving it down increases preload and makes the spring rate harder.
It makes it a lot easier to adjust if the suspension is unloaded (hence
lifting the rear). If it's loaded, the spring has some amount of preload
and it is very hard to turn. Be prepared for a LONG battle with
adjusting this, as it turns very slowly. I think I spent 30 minutes or
more just unloading the spring.
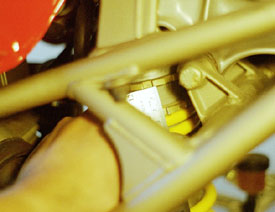
(with the suspension unloaded) measure from the top ring to the bottom
ring. So, once the suspension is unloaded (when the bottom ring turns
freely and the spring is free), move the lock ring down. Then start
feeding it preload wihtout moving the top ring. The difference between
the two rings will be the amount of preload. For example, the stock
setting is 20mm of preload (don't confuse this with the preloaded spring
height of 6.49 inches). With the suspension unloaded, loosen the two
rings until the spring is free from pressure. Then tighten the two rings
up on top of it snugly, but don't actually compress the spring yet. Once
they're in place, tighten the bottom ring ONLY until there is 20mm
difference between the two as shown. That's 20mm of preload.
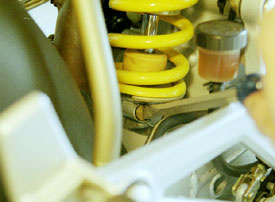
right hand side of the shock. To get a baseline, screw it all the way in,
then out (counterclockwise) 8 turns for stock. The stock setting seems
just fine for me. Screwing it out makes it softer, in makes it harder.
However, don't get confused- rebound damping won't firm your
suspension up in the sense of "preload". It only controls how fast the
spring moves up or down. Shocks are there to control how fast the
suspension cycles, not how hard or soft the suspension feels. Use the
shock setting only to control the bounce factor. If your suspension
wallows up or down over bumps, increase the rebound damping.
expressed herein are those of myself and do not reflect those of Ducati or its affiliates. The "DUCATI" logo and "Circle D" are registered
trademarks of Ducati Motor Holding, S.p.A., all other content on this website is copyright 2006, Monster Man Productions.