|
 |
|
FOR THE DO-IT-YOURSELF DUCATI OWNER
|
|
|
 |
|
|
MONSTER SBK
FORK SWAP
|
|
|
|
 |
|
|
|
|
|
 |
|
|
|
|
|
 |
|
|
|
|
|
 |
|
|
|
|
 |
|
|
|
|
|
 |
|
|
|
|
|
 |
|
|
 |
|
|
 |
|
|
|
|
 |
|
|
|
 |
|
$ 400+
|
|
|
|
|
|
 |
|
|
|
|
|
|
|
|
|
|
 |
|
|
|
|
 |
|
|
|
|
|
 |
|
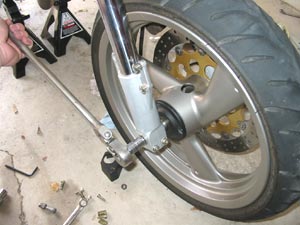
Straps, Jackstands and Steel Rod, Assortment of Allen
Sockets/Wrenches (including 14mm Allen, see tools page),
Torque Wrench and Sockets, Assortment of End Wrenches,
Multipurpose Grease, Hammer and Punch or Specialized
Spanner
|
|
 |
|
|
|
|
|
|
|
 |
|
|
|
|
 |
|
|
|
|
 |
|
|
|
|
 |
|
|
Now this here is a great upgrade. Anybody that knows the horrors of the stock Marzochi
non-adjustable forks on their Ducati knows why something needs to be done. They are
non-upgradeable, they suck at damping, and the only modification I could find was new
seals, and those ran about $50. My front left leaked slightly since I had gotten the bike,
and after 6,000 more miles it was time to upgrade. I started loking into the conversion,
and after a LOT of digging for the right prices, I found that it was actually a worthwhile
idea to entertain. I found everything I needed from friends and the classifieds and
bartering, then went to work.
|
|
|
|
 |
|
|
|
|
 |
|
|
|
|
|
 |
|
|
 |
|
|
|
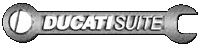
If you've got a 20/17mm solid axle you're probably wondering where the
hell I got the 14mm allen socket necessary to get it out. I didn't. I fought
with that thing using homemade stuff forever. Then I got a long 9/16"
sleeve nut for under $1 (hey- I am cheap, that's been established, but I
was also low on time ;). I slightly ground down the sides of one half of it.
It slid perfectly into the axle and was loosened using a 9/16" socket in less
than 10 seconds. Then unbolt the brake caliper(s) from your forks, slide
out the axle, and remove the front wheel.
|
|
|
|
|
 |
|
|
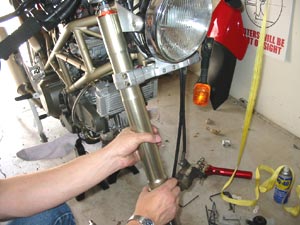
After that, you can undo all four fork mounting bolts on each side,
carefully noting how far above the top triple clamp the stock forks sat, that
way you can match up the new forks and not upset the handling. Loosen
the bolts and slide the stock tubes out.
|
|
|
|
 |
|
|
|
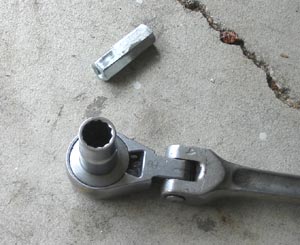
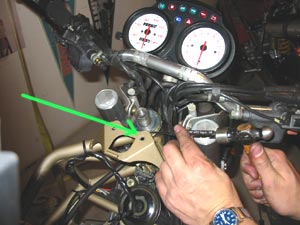
Now move onto the triple clamp. Remove the four bolts holding the
handlebar down, and let it flop forward and out of the way. Then you can
remove the nut holding the triple on.
|
|
|
|
|
|
 |
|
|
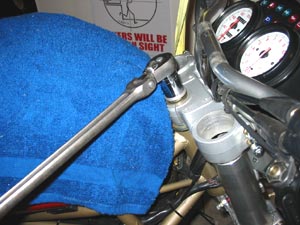
You need to remove the ignition and housing to gain access to the pinch
bolt holding the triple clamp to the head.
|
|
|
|
 |
|
|
|
|
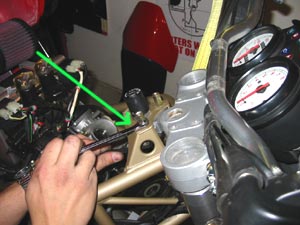
Then you can loosen that and the triple slides right off the top.
|
|
|
|
|
|
 |
|
|
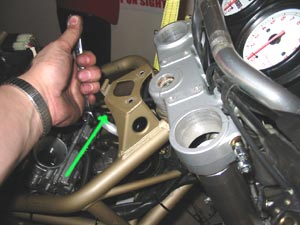
At this point it is a good idea to adjust the steering head bearings. Take
the shims and collars out and lube everything back up, then use a
hammer and small punch to tighten them so that there is smooth, free
movement but no play. You don't want them wobbly, but they need to
move freely. Installation is the same as removal (but leave the top nut
loose to line the triple up with the forks). I will be posting the torque
specs for these pieces shortly- your bike may differ.
|
|
|
|
 |
|
|
Slide the new forks in very carefully.....
|
|
|
|
|
 |
|
|
|
|
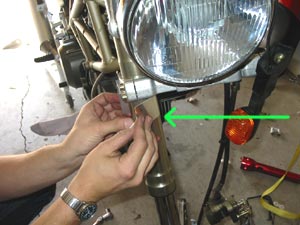
.... while at the same time sticking the shim in. It's best to try to do
this while the tubes are sliding up so they go in smooth. To make it
easy, I pre-bent the shim around the tube, then started sliding them up.
|
|
|
|
|
 |
|
And then you can torque down all the bolts. It is very important that
they are greased, because if not the torque will be off and could cause
damage to the tubes. You can then torque down the top nut on the
triple, reinstall the bar and torque down the clamps, and reinstall the
wheel.
|
|
|
|
|
|
I remember now that I needed to get more pics of how I did the front axle. It involved a lot of shimming and whatnot, too
much to explain without pictures. But, the important thing was that it was a fairly easy and cost effective swap for what I
got out of it. Stay tuned.
|
|
|
|
This page is in no way associated with Ducati.com, nor is it an entity of Ducati Motor Holding, S.p.A. All content, information, and views expressed
herein are those of myself and do not reflect those of Ducati or its affiliates. The "DUCATI" logo and "Circle D" are registered trademarks of Ducati
Motor Holding, S.p.A., all other content on this website is copyright 2006, Monster Man Productions.
|
|
WHAT YOU NEED TO UPGRADE TO SUPERBIKE FORKS ON YOUR MONSTER:
FORKS:
You need to find a good used pair of forks from a 748/916/996/998/ possibly 999/749, not sure. Anyhow, they are out there,
the going rate usually runs around $300 from what I found. Differences among forks usually comes down to the caliper
spacing- from 1999 or so, the calipers went to a mount that had the bolts 65mm apart from each other. Earlier models used
a 40mm mount. The calipers are not interchangeable. Spacers are available to run 40mm calipers on 65mm forks, but at
$150 or so it is not worth it unless absolutely necessary. Tube diamtere and length were the same for all models. Damping
is not a concern to me, since no matter what fork you get, it will be quite stiff on a light Monster. Too stiff in fact to run
perfectly. Don't get me wrong, they work better than stock but on a light bike with a rear bias like the Monster,
spring/damping work needs to be done to get the most out of them. I found a pair of used 748 Showa forks with a 65mm
mount. That meant I had to find a pair of 65mm calipers since I only had a single 40mm caliper. Somebody who knew I had
the 65mm forks contacted me and asked if I would swap the 748 forks with 65mm mount (which go for more money because
they are later and more desireable), for a pair of 916 forks and 40mm calipers included. I said sure, since the mount wasn't
a big deal to me. I was happy just to have SBK forks.
TOP TRIPLE CLAMP/LOWER CLAMP SHIMS:
The shape of the Monster's forks and triple clamp prevent the Superbike forks from sliding right in. The Monster's forks
are almost bell shaped- 54mm wide at the lower mount and 50mm wide at the top mount. In contrast, the Superbike forks
are the same width over the whole length- 53mm. This means you need to either get a new top triple clamp to accomodate
this, or bore out the stock one. Many people frown on the bored stocker, but I have NEVER heard of any problems with
doing so. There is plenty of material left over. I got a used bored triple from Martin at Moto Wheels. It was off his
Monster until he upgraded to the Cycle Cat triple. If you are going for a new one, Moto Wheels sells a conversion kit that
includes the new top triple and the lower shim. If you go that route, be aware that the Cycle Cat piece does not have
provisions for the bar mount, so you would either need to drill and tap holes, or switch to clip-ons. Keeping the bars was a
priority, so I went with the bored stocker. Which brings me to the shim- you need to get a shim for the lower triple,
essentially .5mm shim stock. Cycle Cat sells the shim through Moto Wheels.
AXLE COMPONENTS:
The superbike axles are a 25mm hollow design. This presents problems when trying to fit your current front end
components to the new forks- it is NOT a direct bolt on. If you have a solid axle (say, pre 2001?) your wheels will work, but
with some new items. So, you need a new 25mm axle. You also need new 25mm ID wheel bearings to fit on the new axle,
and a new 25mm ID spacer to keep the bearings separated (so they don't move in on each other). I can't possibly say that all
wheels will work as long as you get the right bearings/spacer because there are differences. For the most part, though, the
stock Brembo wheels will work with the spacer and new bearings.
Finally you'll need a 25mm ID speedo drive. But, it doesn't end there. Superbike speedometers are generally calibrated
differently, so they read about double the speed. Your guts from your current speedo drive will swap into the new one, so
don't be too alarmed. I lucked out and the speedo drive I got (not sure what model it was off of) worked seamlessly, it read
correctly from the get go. If you have 65mm mount calipers, then it is a safe bet you also have a hollow axle. In this case,
you are set- all you need are the forks and the top triple clamp.
BRAKE DISCS/CALIPERS:
Brake calipers/discs are pretty easy to find since everybody is upgrading to Moto GP style radials and wave rotors. Find a pair
of Brembo Goldline calipers in 40mm or 65mm mount for around $150 or so. All the Brembo calipers use the same offset so
are a bolt-on. The discs run about the same per pair, and it's best to buy them as a set so they are the same width
(thickness). All the Brembo rotors have the same offset and bolt pattern so are interchangeable among all wheels.
BRAKE LINE:
If you are upgrading to dual discs then you will need a new brake line setup, and also may need one depending on how high
you mount the forks in the clamps. I upgraded to dual discs and the superbike line I had was too short, so I used the
opportunity to upgrade to stainless Galfer lines from a Monster 900.
Now that you have all your parts gathered, it's time to get started. I couldn't possibly show all the little
steps (WAY too many pics), so will only cover the important stuff. I worked on this over the course of a
week, but if you have everything gathered, the process is only about 6 hours taking your time.
First step is to support the front end of the bike. I used a floor jack to
lift the front of the bike of the horizontal head, and hung it from the
ceiling by the frame using straps. I also used a rod under the engine
case, for a total of three support points. This is important because you
have to wrench on the bike and it needs to be secure.