CLUTCH SLAVE CYLINDER
Tubing, Container, Lots of Towels, Rubber Mallet, Brake Fluid
(DOT 4 or 5.1, but NOT 5)
Ducatis are by no means known for their
reliability or ease of pull. Thankfully,
one of the few aftermarket parts readily
available for a Ducati is the clutch slave
cylinder. Two big names in the industry
are Yoyodyne (sp?) and Evoluzione.
After researching both and asking for
opinions, I purchased the Evoluzione unit.
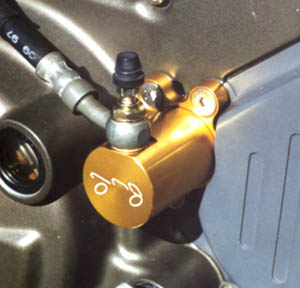
cylinder for a better bleed (the master cylinder doesn't have the banjo bolt/bleeder screw combo). So, it worked out
OK.
leak-free warranty. It was also significantly cheaper than the Yoyodyne, but received just as many favorable reviews.
Plus I got a free banjo bolt. I'll take this space to plug Evoluzione Cyclesports- I had very good luck with them. The
customer service was excellent, I received my order in two days, and the prices were good. Back to the slave cylinder.
The installation was well-outlined in the instructions included, but I'll go ahead and skim over it in the following
section. The first step in installing it is to cover the entire bike with rags. Brake fluid is extremely corrosive to
finished surfaces. If you get any fluid on the paint (or anything else for that matter), immediately wash the area with
soap and water. It only takes seconds to leave a permanent mark!
Ducati with the master cylinder/reservoir/lever in one
piece, not the remote reservoir system. However, the
rest of the process is very similar, so read on. You don't
need to worry about working quickly to avoid getting air
in the system- the second it sucks any amount of air you
are in trouble, so just take your time. First (with bike
covered) unscrew the banjo bolt holding the brake line at
the master cylinder. Next, screw the bleeder banjo bolt
in place of the plain banjo bolt, being sure to use the
supplied crush washers. Do not overtighten, simply snug
it up tight. Leave the bleeder fitting screwed in until
later.
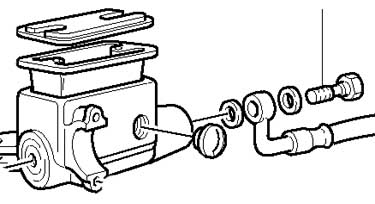
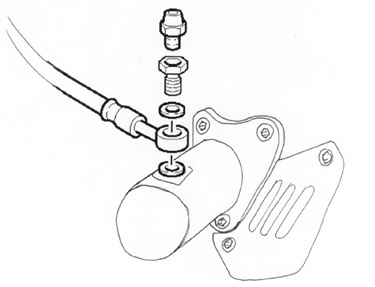
cover on. Next, unscrew the three bolts holding the
old slave cylinder in place. Pull the master cylinder
and accordian seal off of the clutch actuation rod.
You can let the slave cylinder hang there, just be
sure not to pump the clutch lever.
cylinder and pull the line off. Put the new crush
washer on the new slave cylinder, then the clutch
line, then the crush washer, then finally the
bleeder banjo bolt. Again, do not overtighten (i.e.
wrench it hard. It only needs to be tight enough
not to vibrate loose).
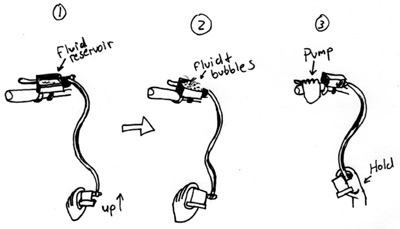
there is air in it. The very first step is to do
something called 'reverse bleeding'. This is done
with the slave cylinder hanging there. With the lid
on the master cylinder (it doesn't HAVE to be on, it
just prevents a stream of fluid from shooting ten
feet in the air) you hold the slave cylinder in your
hands, with the outside facing up. Then take your
finger and push the piston inside as far into the
slave cylinder as you can. A bunch of bubbles and
fluid should come out into the master cylinder
reservoir. You will need to then pump up the
handle (slowly, with the reservoir covered to
prevent a jet of fluid) a bunch of times to get fluid
back down into the slave cylinder.
BE VERY CAREFUL WHEN DOING THIS. If you
pump too much (it takes a LOT of pumping when
there is still air in the system) the piston could
shoot out of the slave cylinder and you will have to
start all over again. So, while pumping the handle,
check that the piston isn't about to reach the end of
the slave cylinder. The more you pump and push,
the less air wil be in the system and the further the
piston will travel with each pump. By the time you
pump it four or five times and you can feel the
piston travel pretty far and there are no air bubbles
coming into the master cylinder reservoir (only
fluid) you should be ready for a regular bleed.
are level, and the reservoir is full. As you bleed, fluid will be used up and you
need to keep adding it. If it gets too low, air will enter the system.
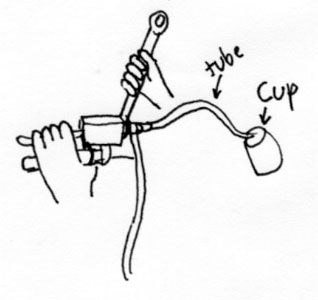
screw nipple, and put the end in a cup or something similar.
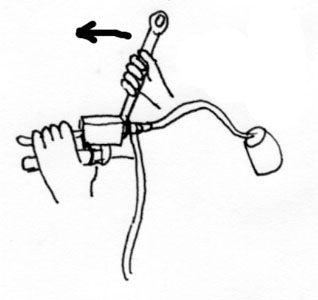
Put the end wrench on the bleeder screw. Pump the handle
several times, and while slightly applying pressure, unscrew
the bleeder screw from the bleeder banjo bolt you just
installed, and continue through the stroke
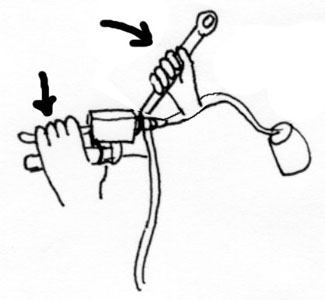
near the end of the stroke,
tighten the bleeder screw
and release the handle. DO
NOT RELEASE THE
HANDLE UNTIL BLEEDER
SCREW IS TIGHT! The only
time the bleeder screw
should be open is when you
are pulling on the handle,
and slowly. Do not pump the
handle when the screw is
open, because every time the
handle is released it sucks
fluid (and the air in the
fluid) back inside. You must
repeat this until you see no
air bubbles coming out with
the fluid.
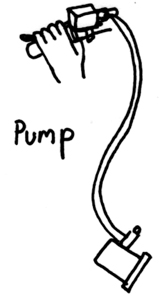
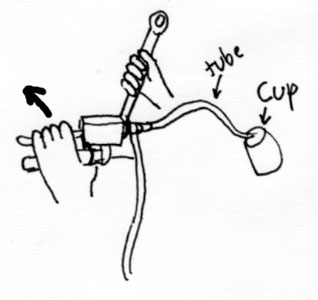
was pulling in the clutch lever, then holding it and at the
same time realeasing the bleeder screw. The springs in
the clutch pack will force the piston back in it's bore, but
since the screw is open, the fluid will take the path of
least resistance and essentially bleed for you. Once the
fluid stops flowing, tighten the screw, then pull in the
handle and hold it again, then realease the bleeder
screw, etc. With this method I was able to get a little
better bleed than before, so you may want to try it out.
I would throw in the occasional reverse bleed from before. This isn't absolutely necessary, and it requires more dexterity
to assure that the piston doesn't shoot out of the slave cylinder. I prefer to do this so that I know there is no air being
trapped.
You can now switch to the bottom fitting and repeat the entire process again. All of the above steps are applied to the
bleeder screw on the slave cylinder. You can bleed the bottom screw with the slave off the bike, because most of the
pressure will be directed out of the bleeder screw. Just be extra careful when pumping the handle that the piston doesn't
shoot out. After you have bled the top and bottom, you need to tap the slave cylinder and fluid line with a mallet to
dislodge any trapped air bubbles.
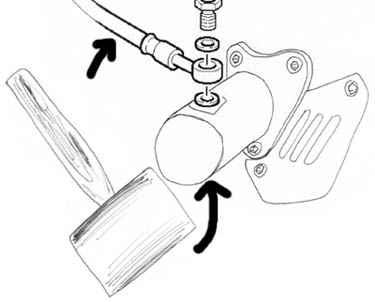
again. Simply bleed the top and bottom
bleeder screws again to make sure there is
NO air. After that, you can install the old
slave cylinder. Clean off the clutch rod,
and apply some high temp grease. Be sure
to read the instructions of whatever slave
cylinder you are installing and get all the
required parts in there (seals and stuff).
Put some Loc-Tite on the bolts and simply
snug them up. Then install the sprocket
cover.
If it doesn't work properly (i.e. no neutral finding at stops, no gear shifting at stops,
hard shifting, etc.), then the most likely cause is still air in the system.
Try bleeding again. If that doesn't work, here are some more suggestions:
When I bled mine, I waited a week and bled it again, only to find an air bubble at the top and bottom. Same
thing when I bled it two weeks later. Air bubbles will lodge in the lines and then surface later.
piston inside. To adjust it, the slave cylinder needs to come off. Once it's off, remove the master cylinder reservoir
cover. Using the reverse bleeding technique, push the piston in the slave cylinder and notice that fluid comes out.
Now screw the screw clockwise about a 1/4 turn. Push on the piston again. If fluid still comes into the reservoir,
screw the screw in again, and so on until you can't push the piston in with your fingers (i.e. no fluid can travel back
into the reservoir with you pushing on the piston). Next, back it out 1/2 turn. Push on the piston again to make sure
fluid travels back into the reservoir, and you're set. What happens if you screw the screw all the way in, but can still
push fluid back in (and can't get neutral when stopped)? That's what happened to me, and some people suggested that
I get an adjustable clutch lever from another model Ducati. I haven't done that yet, but I am sure it will work.
slave cylinder piston to increase the travel of
the rod, but am very hesitant about doing that.
are those of myself and do not reflect those of Ducati or its affiliates. The "DUCATI" logo and "Circle D" are registered trademarks of Ducati Motor
Holding, S.p.A., all other content on this website is copyright 2002, Monster Man Productions. If you would like to link to my page, feel free to do so. If
you would like to use the pictures or text on your own page, please e-mail me, or at least give me credit and install a link to this web page.