THE CARBS
Dial Type Vacuum Gauge or Synch Sticks if You Must Do
it That Way.
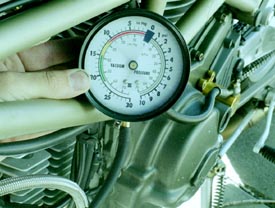
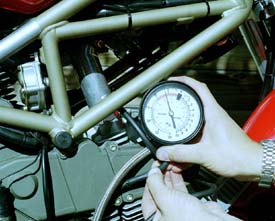
there is nothing to be afraid of. It is a very easy process and the method I use is also
very cheap. You've seen the mercury type gauges sell for upwards of $100. Those are
nice, but also unnecessary. I use a single, $20, dial-type vacuum gauge to synch my
carbs. If you are skeptical about the accuracy, let me assure you that a mercury gauge
would produce the same results. If you still don't want to take my word for it, at the end
the carbs need to be synched. Your bike has two carbs (if you're riding a Duc anyway). Each one feeds a separate
cylinder. If both of the carburetors aren't feeding their respective cylinders an equal amount of mixture, then the
cylinders are producing different amounts of power and that can wreak havoc on an engine. Synching the carbs
ensures that each cylinder is receiving the same mixture as the other, and thus both cylinders are doing their share of
the work. An out of synch carb can produce engine knocking, poor idle, fluctuating idle, reduced power, backfiring,
etc. So, let's get those carbs synched!
have a provision for the smog tubes just as carbed bikes do (which I'm pretty sure they do). Simply
hook up the gauge in the same spots as I show and use the appropriate synching screw (I don't know
where it is on injected bikes, but I know there is one, sorry).
You need to work fast through everything, but some of the stuff you can do before you go and warm it up. Also be
sure that before you start your mixture screws are set exactly equal. Screw one of the all the way in being SURE to
note EXACTLY how many turns it went in, then set it back. The other one should turn in the same amount, then set
it back. If they aren't equal, it will screw up you vacuum readings from cylinder to cylinder.
removed the emissions equipment (you didn't throw those out, did
you?). If the smog hoses are still running into the intake runners,
simply pull them off to expose the nipples. Be sure you don't pull off
the hoses that go into the other side (the inside) of the runners, those
are vacuum lines for the fuel pump and tank shutoff. The emissions
hoses run to the outside of the runners.
brass and has a hole running through it.
them off with vacuum caps. Once you get back from warming the
bike up, you only have to remove them and pop the gauge on.
put some grease on the nipples to
make it easier to slide the cap and
gauge hose on and off. Worked like a
charm.
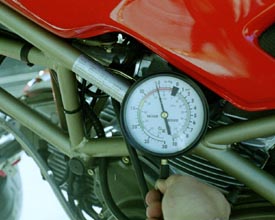
QUICKLY slide the gauge hose on. You need to leave the vacuum cap
on the other side or the idle will shoot sky high and you will also lose
your vacuum, and therefore your fuel supply (it's vacuum operated).
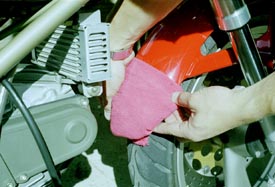
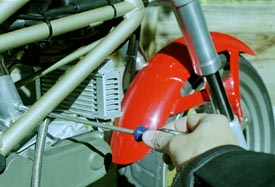
rag. You have to do this because the oil cooler will be
laying right next to it and could damage the paint.

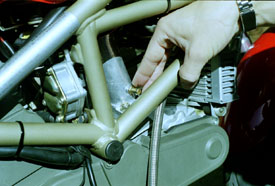
get your screwdriver up in there to adjust the synch screw. Of course,
you need to do all of this quickly so the bike doesn't overheat while
sitting there idling.
"What the hell has Monster Man gotten me into? This gauge deal
sucks! Why is it bouncing all over!?!?" Good question. The pulses
in the runners are quite rapid and all over the place. You may have
noticed that in the emissions tubes there were severe neckdowns
(plastic pieces), limitng the size of the tube to about 1/16 of an inch.
cannister. How? I can't say, because I'm not an engineer, I just
know what they were for. The same principle can be applied to the
gauge. If you simply pinch the hose down, you will see that the
vacuum stabilizes and it reads a constant vacuum.
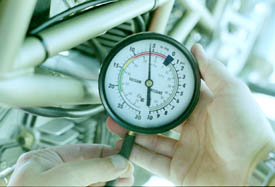
bike and note the reading. Then, very quickly, remove the gauge hose
from the nipple and re-install the vacuum cap. Then, on the other side,
take off the vacuum cap and quickly install the gauge hose.
they are different, then the carbs need
to be synched. That's the fun part.

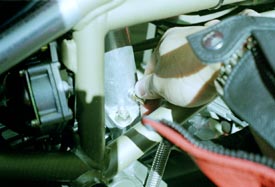
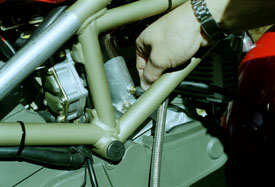
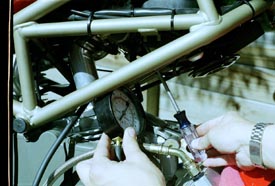
screw is used for synchronization. The synch screw
is the furthest back one, and often gets mixed up
with the idle screw. Click for a larger version.
vacuum gauge. Take a quick note of the reading, then switch back to
the other side. If they are still not equal, turn it some more, take a
note, switch back to the other side, take a note, etc. Hey, I never said
it was easy!
identical, which means they are producing the same power, which means that at a certain throttle (idle, for example),
they are flowing the same amount of air/fuel mixture. Mercury stick synchronizers will tell you the same thing, but
the gauge is way cheaper and you can whack the throttle open without fear of sucking the mercury into the engine.
and with the engine running, remove one of the cylinders' plug wires. The tach will immediately drop a certain RPM,
usually around 300. Then, plug the wire back on and remove the other one. The tach should drop the same amount
of RPM as the other. That indicates they are doing the same amount of work. I performed this RPM drop test and
they came out equal. I should note, however, that many specialists don't approve of this test because it is hard on the
engine. Even though my Ducati factory manual tells how to do it, I only did it once to double check my work. I agree
with the experts, it does seem hard on the engine and electrical system. Some people have warned of fried electricals,
so perform this test at your own risk.
those of myself and do not reflect those of Ducati or its affiliates. The "DUCATI" logo and "Circle D" are registered trademarks of Ducati Motor Holding, S.p.A.,
all other content on this website is copyright 2006, Monster Man Productions. If you would like to link to my page, feel free to do so.