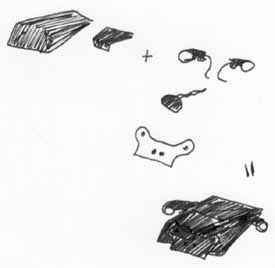
RELOCATION BRACKET
MAKING YOUR OWN BRACKET ON THE CHEAP
AND LOOKING GOOD DOING IT
Wrench, 4mm and 5mm Allen Wrenches, 20ga. Sheet Steel,
Hammers, Flat Black Paint, Primer, Sandpaper, Rivet Gun

inches of overhang cut off
already!
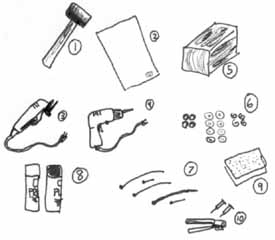
1. Rubber mallet
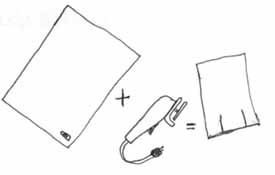
2. 22 gauge sheet steel, about 12x18". Available at Home Depot or
similar.
3. Electric or pneumatic grinder with thin cutting wheel.
4. Electric drill and various drill bits.
5. A block of wood with a hard edge.
6. 8 thin flat washers, 4 lock washers for the long screws on the back,
and four or more nylon washers in metric size to fit the four screws.
7. Various zip ties.
8. Primer and paint. I used an epoxy primer and flat epoxy enamel for
durability.
9. Sandpaper.
10. Rivet gun and two rivets (not absolutely necessary)
won't go into an explanation of how to do that because it's very simple.
The wires are also hard to mix up in case you forget where they went.
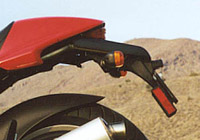
The only part that requires work here is to cut off the existing
reflector/bracket area that extends below the license plate. The
previous owner had already done that on mine. If you don't like the
idea of cutting stock pieces (which I wouldn't have done), you can bolt
the license plate directly to the bracket you make, instead of bolting
the bracket to the bracket you make. You'll end up with the license
plate bracket, two signals, and the license plate light.
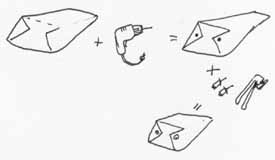
of the bike, as far back as it will go and still remain level with the
black plastic piece. Then mark on the sheet two lines, which is where
you will bend the bracket down on each side. You want the bends to
be inside the frame, so that it will be flush with the black plastic piece
on top and will bolt easily to it with the four screws. Still confused?
The two tubes of the frame are not flush with the black plastic piece
from the top. You want the bracket to be flush with that, so the bends
for the edges need to be inside the frame rails. Once marked, cut the
grooves along the lines just until the cuts go under the cover of the
black plastic piece. You'll end up lopping off the rear of your bracket
in the end for fine tuning, so you just want the general area.
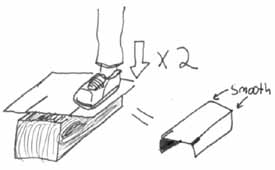
you made, and bend it down on one side. Now, do the other side.
You don't want a hard edge, but I said to use a hard edge block of
wood. That's just cause it's easier to line up with. Once the bend
has started, you can finish it by hand. If you really want to get
fancy, you can bend it over a steel pipe or something.
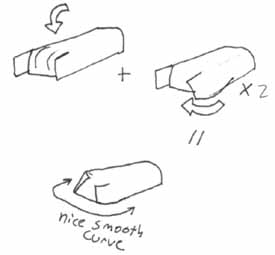
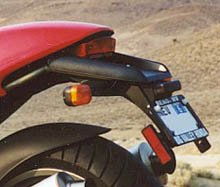
to, as shown. This is angled downward, not straight down. You can
see from my picture that the plate is at an angle. Now, you will bend
the sides around. This is done by hand and again, not straight down.
It will be wide at he front and narrow at the rear, and have a nice slow
curve going around each side. The sides are angled downwards
instead of straight down.
top of the front, going forward. This will make it look like a
lopsided pyramid from 3D view, but a wedge from the side.

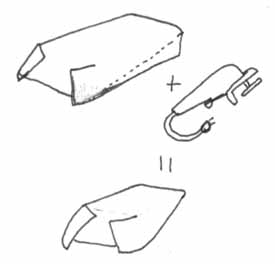
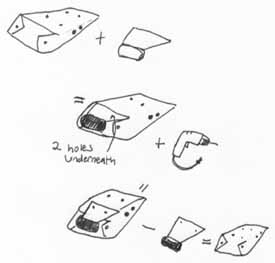
down further than the rear tab for the plate. This is where you will
cut the edges even with one another, and make the edge continuous
all the way around.
underneath on each side. These are for the rivets that will secure
them together to prevent vibration and rattling. Now use the rivet
gun to pop the rivets in. If you don't have a rivet gun, you can
simply use a nut and bolt with a lock washer.
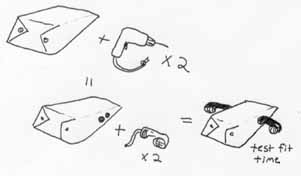
bracket down and cut off however much you need to off the rear.
Stick the license plate bracket, license plate, and license plate light
up underneath the black plastic piece with the bracket in place and
see how much you need to cut off the rear. Once you get that done,
you can put it all back in place and see where the best place for the
turn signals are. I mounted mine as far forward as I could. Keep in
mind, the lock button for the seat gives you an inch less room going
backward than the other side, so mark that first. Then drill the
holes for the bolt and wires, and mount them. They probably won't
be even at this point, but you should put the bracket up under with
the signals on, test to see that everything fits up under the black
plastic still, and bend each side of the bracket so that it is even. DO
NOT PULL ON THE SIGNALS TO BEND THE BRACKET. They are
not as strong as steel and will break. Just hold the bracket and
push on the sides of the steel until it's straight.
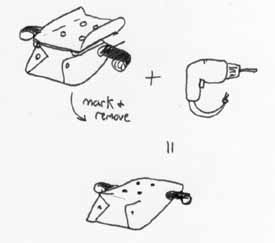
and mark through the top where the four holes are. Before you drill,
make sure that the signals don't hit the frame, and that the license
plate light still fits up under the black plastic. Then take it off and
drill it. Then mount it in place and check for fit. Fine-tune all the
angles and make sure they are straight. My turn signals are actually
angled down and forward slightly.
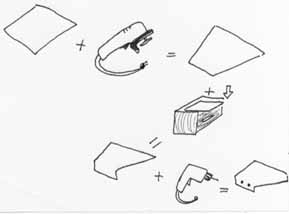
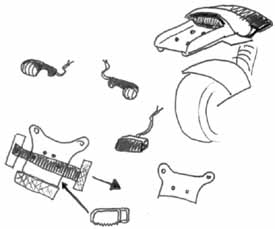
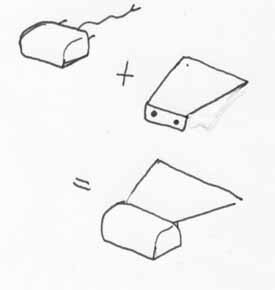
steel you cut off the
back of the bracket to
make the license plate
light holder bracket.
It needs to be a wedge
type shape as shown.
The small end should
be just wide enough so
that the two bolts
coming out of the back
can go through and be
secured. Mark and
drill those holes. Then
bend it at a 90 degree
angle about a half inch
above that. Now
mount the light on the
bracket. With the
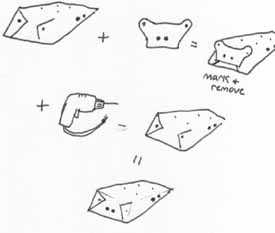
plate/signal bracket up
in the
underneath, between the bracket and the black plastic piece. The two
holes at the front (of the bike) will be uncovered, but now the two
rear most hole will be blocked by the new bracket. Get it straight
underneath and mark and drill the holes.
license plate and bracket where they will be on the
new bracket and mark and drill the holes in the
bracket.
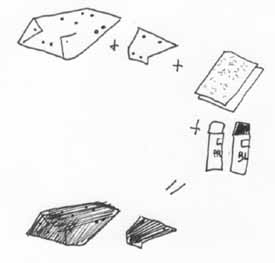
all the bare metal with a rough grit paper then smooth it with a
fine grit. After that, prime it with the epoxy primer. Let that dry
and then hit it with the flat epoxy black. The flat looks exactly
like the black plastic on the bike. Now for the last of the drilling.
You need to drill two small holes about a half inch apart. Send
one of the long zip ties up through the hole, and down through the
other.
it into place with the lockwashers and nylon nuts. Plug the wires into
their original sockets and zip tie the entire mass with the zip tie that
is waiting there. Make sure no wires are hanging down. If I left
anything out, it must not have been important. Make sure everything
is tight and that there is no interference anywhere. Test the signals
for proper operation and adjust as necessary. Enjoy!
are those of myself and do not reflect those of Ducati or its affiliates. The "DUCATI" logo and "Circle D" are registered trademarks of Ducati Motor Holding,
S.p.A., all other content on this website is copyright 2006, Monster Man Productions.