ADJUSTMENT
and Scribe (4v), 6mm Allen Socket, Torque Wrench
procedure could be harmful to your bike and could cause severe injury in
the event of a crash. If you are at all unsure of your ability to perform this
procedure correctly, PLEASE do not attempt to do so.
The scheduled replacement is every 12,000 miles (I suggest 11,000), so it is a good idea to check them periodically,
especially coming up on the replacement mileage. The most important thing that I can stress before I start is to not
adjust the belts too tight. That is the most common reason for belt failure. If you go to adjust your belts and notice
fraying on the edges or missing teeth, that means that they are too tight. If adjusted too tight, there is a good chance
that at high temps and high RPM's the belt will break, sending the head timing out of whack and slamming the piston
into one or both of the valves. At those speeds it could also lead to a severe crash. Not fun. So, I can't stress enough
that getting the proper tension is CRUCIAL to engine life and your safety. One other thing I suggest is torqueing
the adjuster pulley bolts to 30 Nm, or 23 ft-lbs. I was unable to find a torque spec for these bolts, but 30Nm was a
suggestion I got based on the soft metal and small bolts. You'll find that they may even need less torque. If anybody
has found the correct torque figure for these bolts, I would love to hear from you. Before you start, the engine should
be cold (doing it while hot could mess with the readings). I will first show how to check the belts without removing the
whole cover, then move on to adjustment.
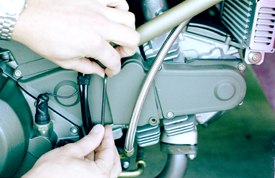
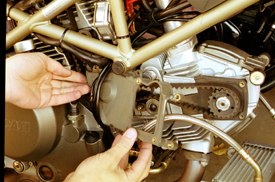
from start to finish, so it can be done regularly without hassle. The first
step is to remove the two bolts holding the inspection plates on the
horizontal and vertical cylinder covers.

because of the wiring and fuel line in the way, so
just pull those out of the area for now.
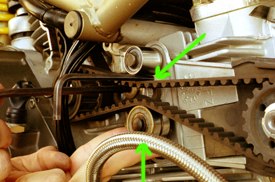
belts for wear, cracks, or missing teeth. The belts should be in good
condtion. If not, I suggest they be replaced immediately. You can
see the belt held in place by two rollers. One of the rollers is in a
fixed position, the other roller can be adjusted up or down to increase
or decrease tension.
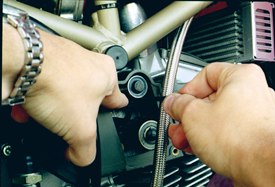
roller. The belt isn't springy, so "removing the slack" shouldn't be a
subjective issue- there is either "slack" or there isn't. That doesn't
mean you need to try to rip off the belt by pushing down on it, it simply
means that you need to push it down with normal pressure to remove
any slack. Your measurements are based on this feeling, so just play
around with it until you think you've got it.
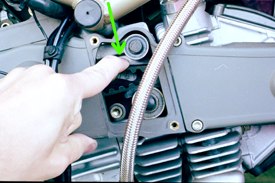
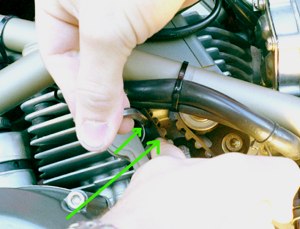
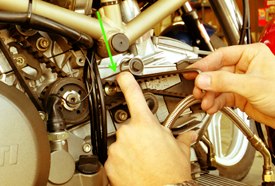
5mm allen wrench bewtween the belt and the fixed roller. It should
feel like a feeler gauge does- SLIGHTLY snug. This means that
there shouldn't be free space between the belt and the allen or the
roller and the allen, but rather the allen should slightly contact both
the belt and the roller.
only use a 6mm allen. The clearance on the vertical needs
to be 6mm because it runs hotter than the horizontal (it's
up underneath the tank and doesn't receive the fresh air
that the horizontal cylinder does) and the parts expand
more. If it was only 5mm, the belt would stretch too tight
and possibly break.
vertical, if a 5mm won't fit it is too tight, if a 7mm fits, it is too loose. There is a big difference in tension between
one allen size and the next, so it should be obvious if you have the right tension.
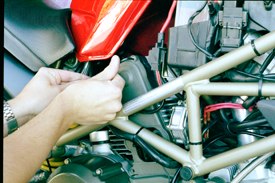
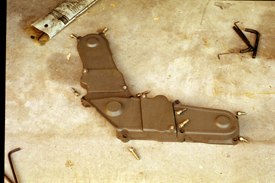
pain (see the two pictures at the bottom of the page). To do it the long
way, first you need to lift the tank and remove the two top cover bolts.
Then move down and remove the two bottom bolts that go through
the horizontal cover and into the block.
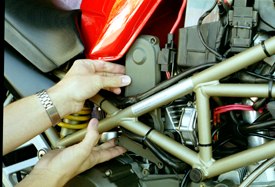
cables (not shown here, but done later) out of
the way, you should be able to wrestle the
cover out. It's a pain and the cover is fragile,
so take your time.
cover, then the two bolts that go into the other
horizontal half cover.

bolts and pull that down out of the way, being
careful not to kink the lines or scratch the
front fender.
cover that threads into the block and take
it off.
associated bolts. You can go ahead and put the
inspection plates on now while the hoses are
out of the way.
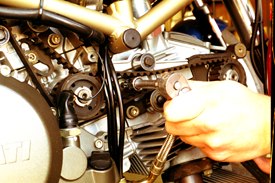
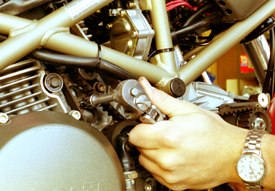
tension, loosen the two
adjuster roller bolts
using the 6mm allen
socket. These are
probably on there
TIGHT. You'll see that
it only takes a slight
amount of travel to set
the tension from one
extreme to the other, so
you'll have to be careful.
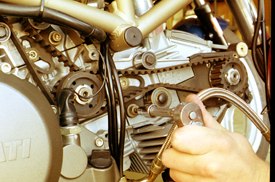
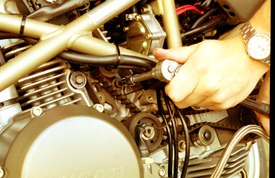
(on the horizontal cylinder) wedged between the belt and the roller,
push up from the bottom using the adjuster roller and take the slack
out. At the same time, tighten one of the adjuster bolts to hold it in
place.
using the procedure outlined above for checking
tension. It should come in perfectly at 5mm.
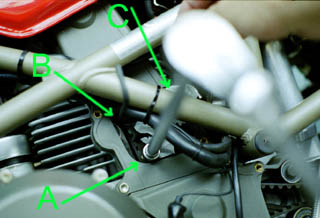
needs adjustment, loosen
the two adjuster bolts
using the 6mm allen
socket.
only this time using a 6mm allen wrench in place
of the 5mm that you wedged in the horizontal.
Wait a minute- that is the horizontal cylinder in
the picture. What the heck? I know, the pic I
took of the vertical using this method didn't turn
out, so you'll have to use your imagination. Once
adjusted, tighten on of the adjuster bolts slightly to
hold it in place and check the clearance normally.
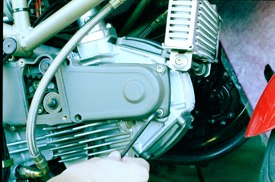
bolts (two on each cylinder) to 30Nm (23 ft-lbs) or so. Next, put the covers back on. There's nothing special about
that, just put them on in the reverse order, and snug the bolts up. If overtightened, you could crack the covers. Be
sure to put the oil cooler and battery cables back in place, and move the wires and fuel lines that you moved out of
the way. If you're paranoid (like me), before putting the covers back on, mark the adjuster bolts with marking paint
so you can see if they back off. Now take the bike for a short ride and let it cool down completely. Then, remove the
inspection covers and check the tension again just to make sure. It is a really simple process if you take the time to
be precise. Good luck, and as always if you have any questions, e-mail me.
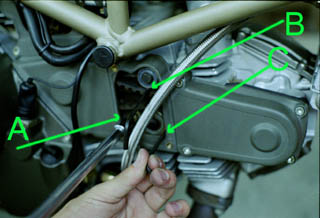
process) Here is what you do: warm the bike up with a ride first, it makes it easier, then take off the access covers
(on later model Monsters only) and loosen the adjuster roller bolts with your socket (A). As described earlier, the
clearance is tight, but it is possible to get in there. Then, stick your 5mm allen socket in the gap between the belt and
the idler roller (B). Then, use a hex key or something else to pry the adjuster roller up so that it tensions the belt
sufficently (C). While holding tension on the roller, tighten the bolts (C). Once you let off, and remove the 4mm hex
from between the belt and the roller, you should have the proper tension. Double check by pulling the belt down
(removing any slack) and stick your 4mm hex between the belt and the roller- it should fit perfectly. Note that when
doing this while the bike is hot, you should use the same size hex on the horizontal and vertical. This is because the
extra heat on the vertical (from reduced airflow) has already strecthed the belt to the max so you don't need to bank
any extra room for when it warms up (i.e., instead of a 6mm hex as described earlier). That's also why you use the
4mm instead of the 5mm, it's because the belt is already heated and has shrunk a bit and if you use the 5mm it will
be too loose when cold.
in a different place than on the 2v models- up in the top of the head between the two cam rollers. The motor should
be at TDC. You should first start out with the belts completely tight, that is no deflection (movement) of the belt
when pressing on it with MODERATE pressure. I know that's a bit subjective, but use some common sense- are you
pushing on it too lightly, or are you wrenching on it too hard? The belts aren't very elastic, so it should be obvious,
just find the middle ground. Once tight, scribe a line on the head as close to parallel with the top of the belt
(between the two rollers) as possible. This line will show where the belt is in relation to the head when tight, and will
be used to measure your deflection against. Once that's done, loosen the belt so that you can push down on the top
of it (between the two rollers) with a 5mm allen wrench with MODERATE pressure and have the top of the wrench
line up with the bottom of the line you scribed. In other words, you want 5mm of deflection in relation to the head,
measured between the two cam rollers. Once you find that point, tighten the adjuster bolts, and you're set.
Everything else should be the same. Whatever you do, don't overtighten the belts. If you're not sure, err on the
loose side and you'll be better off. Please do research in as many different places as you can. Go to any search
engine and type in Ducati belt tension and you should get plenty of results for 4v models. If you see anything wrong
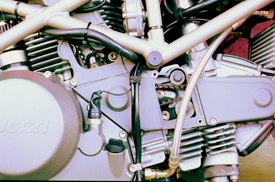
in the above description, please e-mail me so I can fix it ASAP. Here are some pics of the checking procedure on a
998 just for illustrative purposes:
Ducati that uses a laser to measure the amount of deflection. You flick the belts and the laser measures the
vibrations to give you a reading. The head arrangement is unlike other 4v bikes, so you will either need that tool or
you will need to have an authorized workshop check it for you.
PROCEED HERE.....
herein are those of myself and do not reflect those of Ducati or its affiliates. The "DUCATI" logo and "Circle D" are registered trademarks of Ducati
Motor Holding, S.p.A., all other content on this website is copyright 2006, Monster Man Productions.