REMOVAL
screwdrivers, towel, RTV silicone, vacuum caps, short length
of 1/4" tubing, 1/4" plastic "y" connector, hole plug and filter
(or kit from Evoluzione), and a bit of patience.
testastretta engines) put out a lot of crankcase pressure which could result in
oil being forced out of the breather under certain conditions. This is not
normal, but it is possible, that's why I am warning you. In the event oil is
forced out, it could get on the tire and result in a crash. Again, it SHOULD not
do that (the breather valve is supposed to let air but not oil out), but it could
happen. Perform this mod at your own risk. I recommend you keep a very
close eye on your engine for signs of oil residue.
equipment, so I'm OK. If you live in a locale that requires emissions equipment, like California, you're on your own. Please
do some research.
Let me also state that removing the emissions isn't a performance mod, you're not gaining any horsepower (except for
maybe the restrictor removal). I did it to shed a bit of fat and to free up some space- with all that enclosed bodywork,
the absence of more hoses and containers means that more air will be able to flow across the engine and lead to better
cooling. Plus it looks cleaner. The basic principle is the same as on the 2 valve, but it's a bit more time consuming, so
let's get started.
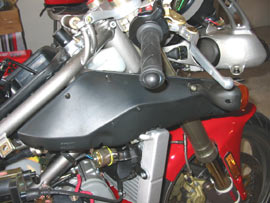
just pop off the connector for the tail lights, then the little
rubber retainer from the two pins, then pull the pins out of the
bracket and pull the seat off.
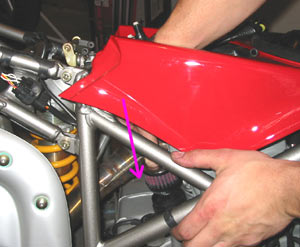
allen key, then it tilts up in the rear and the front is held in
place by a big pin in the front. But, you still need to attack the
lines underneath. It may be a good idea to prop up the rear with
a block of wood or have a friend help you hold it up.
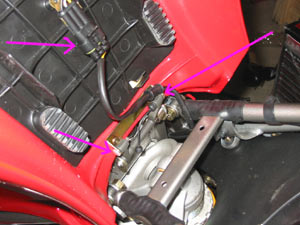
faced with- a
connector for the
fuel pump wiring,
unplug that gently.
Then to remove the
two quick
disconnect fuel
lines, press IN on
the release tab, and
pull STRAIGHT
down. Don't try to
twist or pull out at
an angle or you
could damage
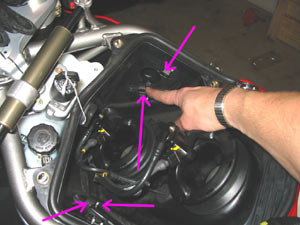
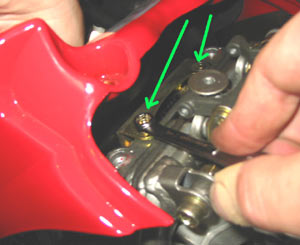
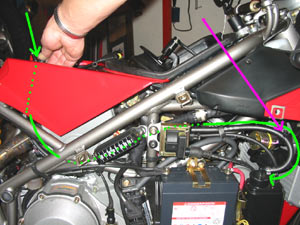
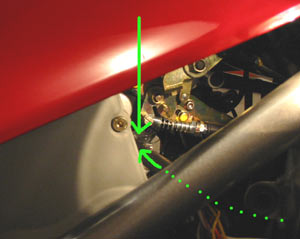
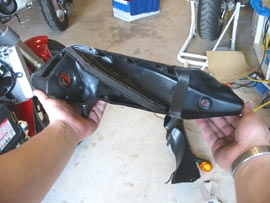
always need replacement). The two green arrows point to holes where the drain tube (right side of picture) and the
emissions tube (left side of picture) go. The above image shows my new drain setup (two into one), but as you remove
the tank there will be two separate black vacuum lines. They pull right off with no hassle. After that, you can lift the
tank up and back, and GENTLY set it down on a towel or something.
the retaining clips from the box. That way the lid can lift up without
breaking the runners, and the lid can lift up further. To get them
back down later, the end goes in, hooks the retainer, and then you
snap it back. It's the same kind of clip as on fire extinguishers to
get an idea of how it works.
with your allen key. I tried and tried to get the shower injectors off
so the whole piece could come off, but didn't want to break anything.
I left it loose and that was enough. I later figured out how easy it
was to remove the whole injector, so you'll probably want to do that.

sides of the injector
body, then twist to the
left and pull up. it is
held on there by two
tabs and pegs, kind of
like a fuel cap.
further than is shown in the following pictures, thus saving much
more time and allowing better access. To put the injectors back on,
simply put them back down in the airbox at the angle you pulled
them out, and twist them back to the right until the pegs on the
injectors lock under the retaining tabs on the lower portion. It's
hard to get a pic of, but you'll know it when you see it.
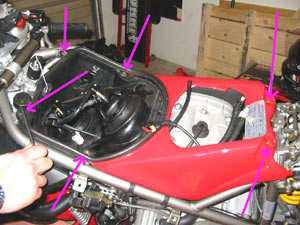
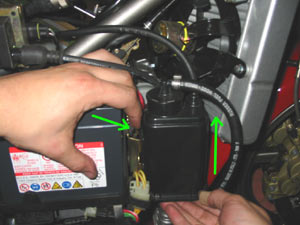
reach in with your wrench and remove the two PCV box retaining
bolts.
valve on the rear of the engine block.
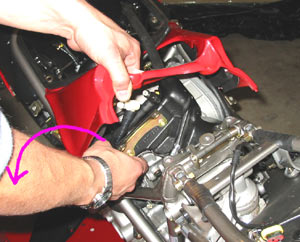
shaped hole on the right side of the bike). Then, you can (as gently
as possible) lift up on the lid and pull the box and hoses out from
their cavity. It is very hard, and you need to keep twisting and
trying to make it come out as easy as possible. Good luck.
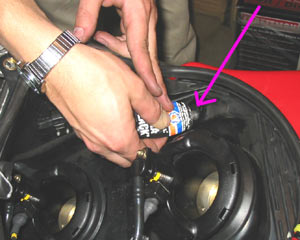
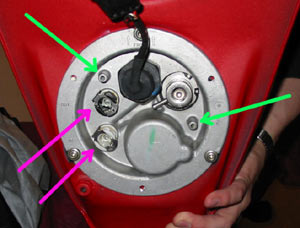
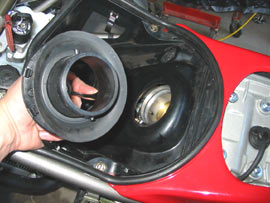
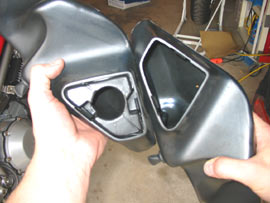
some RTV silicone. I believe the size for the 998 is 19mm, although
the hole is oval so the sealant is necessary.
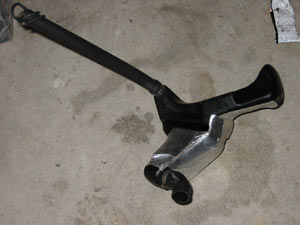
enough to sap airflow and look like hell.
hole plug from Evoluzione, although Summit Racing sells the
filter as well. It has a 3/4" opening, is 2" wide, and 1 1/2" high.
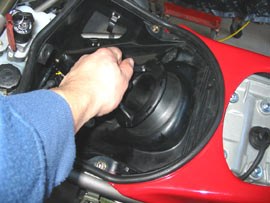
It's best to go from the top to get the most leverage, and also
put some WD-40 on the lip.
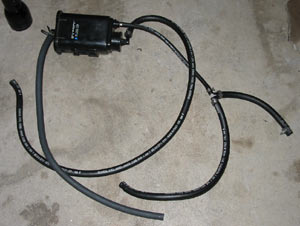
routing all the way back to the evaporative cannister (in green).
Then you can pull it out.
tabs, and pull the box upwards. Very easy to get
off.
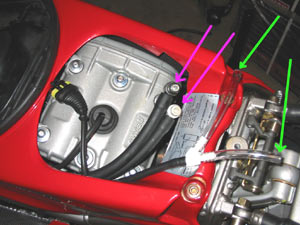
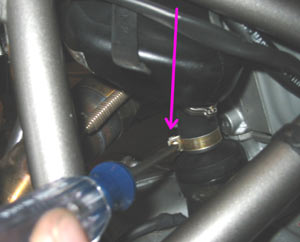
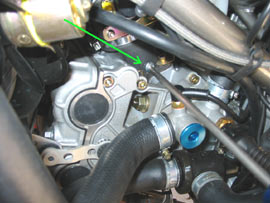
line from the box, back to where it splits into two with a tee, then
go to the right side intake runner. It is up and under the cover that
you just had to fight with, and this is by the far the hardest part to
get off. I didn't have a long end wrench, so I had to reach in there
while pulling up on the cover. It took a while, but I finally got the
hose clamp loosened. After that, I pulled the line off the nipple,
removed the nipple, and capped it with a short M6 screw.
screw. That's because both of the vacuum caps fell off. I don't
know when or where, and I don't know why. Live and learn I
guess. The screw works much better.

down towards the bottom front of the left side of the bike. Again,
pull off the line and nipple and plug the hole with an M6 screw.
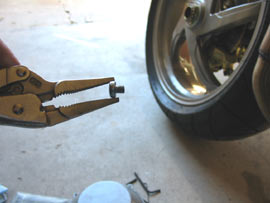
such a tight spot. (The nipples are the little brass inserts in the runner
that have a hex towards the back and a very small hole running through
them. The whole piece comes out). Once out, coat the screw with RTV
silicone and plug the hole for an airtight seal. A vacuum leak robs
performance.
bike up. I now know the vacuum caps were a bad idea if not
clamped tightly on, and I have noticed no bad side effects (like oil
all over the back of the crankcase). It actually starts up better
when hot since it's not sucking gas fumes.
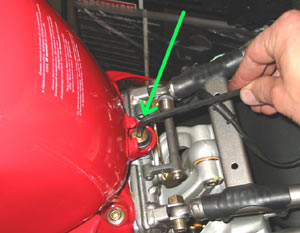
5" or so lengths of tubing, and ran one to each nipple on the tank. That way they both drain into one. This is a
necessary step- don't just plug the hole in the tank where the meissions used to go, it could cause a build up in the
tank of pressure, or worse. Also, don't leave it uncapped because that could lead to a fire.
that is the huge rubber restrictors in the intakes designed to reduce
noise emission. They rob power and are easily removed. Start by
stripping off the side fairings and front upper fairing. Then, you'll
see the runners have a bunch of screws through them. You'll need
to take all the screws out (there's about 30 of them!) to get the
runners apart.
gasket at the front goes under the lip of the tank, and install the quick connects gently. Make sure the spring
realease is still in the released position by pushing on the tabs as when you took them off (they have a tendency to
unrelease, and thereby rip an o-ring upon installation as happened to me). Take it slow, and all will be OK.
Remember- take it easy on the electrical conncetors (I somehow ripped a wire out of one of them and had to
disassemble it and re-connect it), also don't forget to re-attach the clips holding the intake runners into the box. Good
luck.
views expressed herein are those of myself and do not reflect those of Ducati or its affiliates. The "DUCATI" logo and "Circle D" are
registered trademarks of Ducati Motor Holding, S.p.A., all other content on this website is copyright 2006, Monster Man Productions.